
Positioning
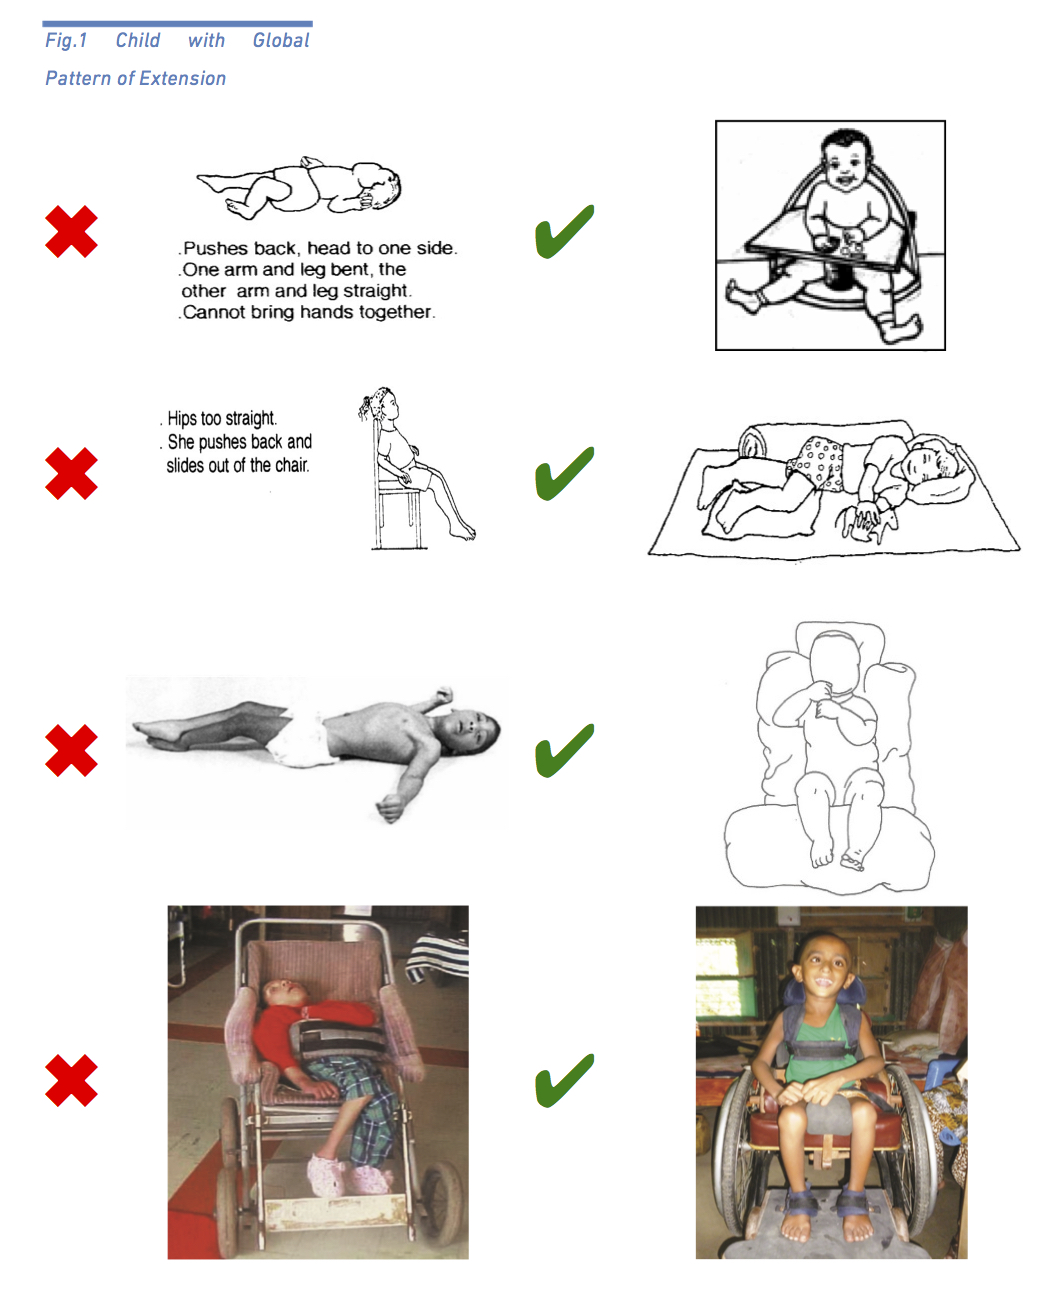
Positioning students for ideal participation involves placing them into a posture that promotes normal functioning (Cicirello, et al., 1989).
Proper positioning can help to alleviate access barriers and increase what a student can do independently, as well as prevent contractures and pressure sores.
Positioning students in a stable position, possibly with the assistance of special equipment, can allow them to greater participate in their physical and social environments.
Educators can place students in positions that are functional, comfortable, and/or healthful (1989).

Functional positions allow for the student to see what is happening around them, keep their hands free to use, maintain eye contact, have minimal motoric demands, increase their independence, and optimize their participation in their natural routine.

Comfortable positions are individualized to the student’s body condition, are context-dependent, and are changed often—before they are uncomfortable.

Healthful conditions promote typical development, promote strategic compensations for access barriers, and prevent or delay progressing disability.
Factors that affect positioning are muscle tone, reflexes, and function.
Positioning Strategies According to Muscle Tone
Educators need to understand muscle tone in order to understand how to use positioning to help students maintain functional and healthy postures to optimize the participation of their students (Cicirello, Hylton, Reed, & Hall, 1989).
Abnormal muscle tone can occur in isolated extremities, or can affect the entire body, and can be named according to the affected sites.
- Damage to one side of the brain that results in the impairment in movement for the opposite side of the body results in hemiplegia (Howard, et. al., 2014).
- When both sides of the body are involved but one side is affected more severely, it results in double hemiplegia.
- Paraplegia only affects the legs, while quadriplegia affects all the extremities.
- Diplegia also affects all the extremities, but more significantly impairs the legs.
- Monoplegia only affects one extremity, while triplegia affects three (2014).

The design of the environment, as well as the manner in which practitioners handle and position students will influence abnormal muscle tone (Cicirello, et al., 1989).
- Stimulating activities and environmental contexts will increase tone, while relaxing environments will decrease muscle tone. A child can have normal tone, hypotonic/low-tone, hypertonia/high-tone, or fluctuating/mixed-tone.
Students with hypotonicity/low-tone have weakened muscles that are flaccid or loose, and struggle to resist gravity (Howard, et al., 2014).
- They have overly flexible joints and poor posture due to weakened core muscles.
Students who have hypotonic muscles may need physical stimulation to increase their tone (Cicirello, et al., 1989).
- Environments for these students should be stimulating and exciting, and practitioners can employ methods such as bouncing a student on their lap or playing music.
Alerting activities, such as quick movements (i.e. swinging, shaking, rolling, spinning, or bouncing), oral motor activities, or loud noises or music, can help prepare students with hypotonia to participate more fully in their environment (Halloran, n.d.).
These students may require additional response time, due to delayed reactions.
When working with students with Hypotonia:
- Have them work towards the simultaneous use of their agonist (muscles that execute primary actions in movement. i.e. flexor muscles in the knee when the knee is bent and fighting against gravity) and antagonist (muscles that coordinate with agonist muscles during movement. i.e. extensor muscles in the knee when the knee is bent and fighting against gravity) muscle groups (Hinchcliffe, 2003).
- Have the child engage their muscles to work against gravity.
- Have the child engage in weight-bearing in different positions and while using all of their limbs.
- Engage in sensory stimulation and joint compression to alert them and to get them ready for learning.
- Vocalizing and laughter can help to increase tone.
- Check to make sure that low tone in young children does not change to high tone or fluctuating tone as they age.


Students with hypertonicity display tight muscles with restricted range of motion, and may move in a contorted manner.
Hypertonia occurs when there is damage to the motor cortex or the spinal cord, and increasingly decreases range of motion as the muscles and ligaments shorten. (Howard, et al., 2014)
Severe muscle tightness can lead to contractures, which is chronic tightness of the muscles, that can be very painful.
Students with hypertonia can be further characterized as having flexor or extensor tone, which will determine proper positioning.
Students with flexor tone have joints, such as the elbow, wrist, fingers, knees, hips, and ankles, that are bent when in a resting position (Rosen, 2018).
“Breaking up” abnormal tone in one extremity should help to normalize tone in all extremities.
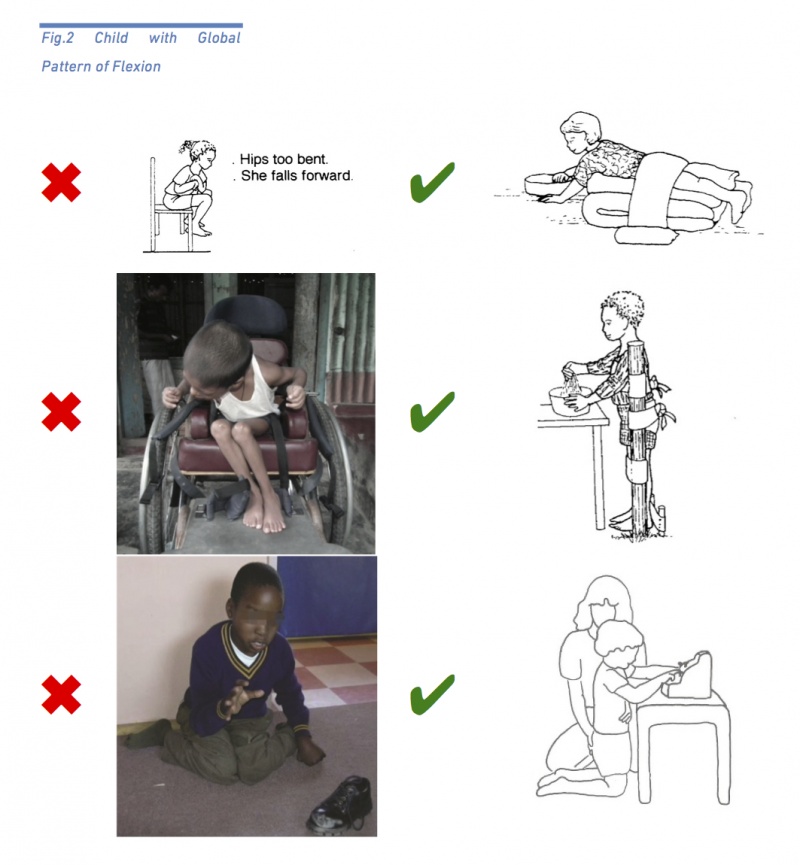
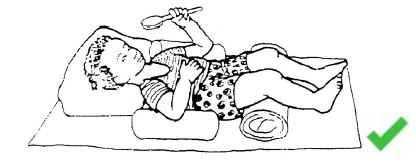
To position students with flexor tone “out of pattern“:
- Use sidlying to straighten their knee
- Use a wedge to keep knees from flexing
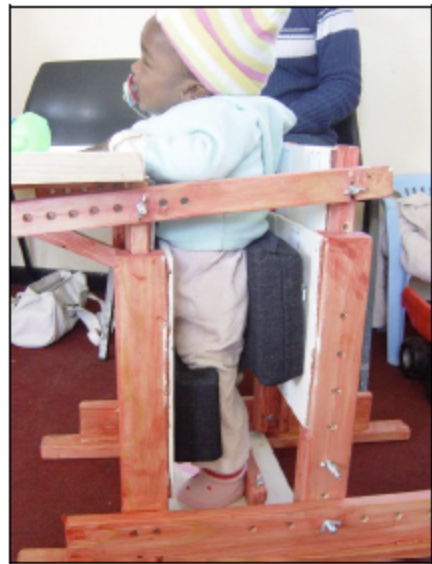
- Utilize special equipment such as a stander
- Offer support at the hips to prevent flexion
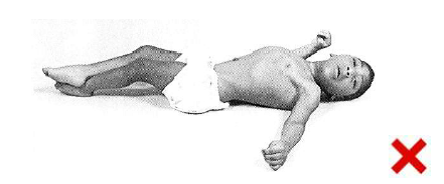
Students with extensor tone have joints that lock and are very hard to bend when at rest, which can lead to contractors that prevent the legs from bending. Scissoring of the legs caused by hypertonia of the hip adductor muscles, a part of the hypertonic extensor pattern, is another common issue for students with extensor tone.
As with flexor tone, “breaking up” abnormal tone in one extremity should help to normalize tone in all extremities.
To position students with extensor tone “out of pattern”:
- Use a corner chair to keep hips in flexion
- Use sidlying to flex their knee
- Increase hip angle to more than 90 degrees
- When seated, increase hip angle to more than 90 degrees and position the foot behind the knee
When working with students with hypertonia, it is very important to minimize high tone as much as possible.
- Hypertonic increases in tone affect comfort, concentration, balance, coordination, and readiness to learn.
To minimize hypertonia, teachers should try to avoid loud noises, sudden movements, overly fatiguing the student, temperatures that are too hot or too cold, overtaxing activities, stress, or touching hypertonic muscles.
Activities that increase tone in children with hypertonia should be followed by more calming activities that allow their muscles to relax, giving them greater range of motion.
- Positions that allow for sidelying, gentle swaying, slow rhythmic motions, or gently twisting the trunk help to reduce tone, and therefore increase participation in students with hypertonia.
In order to optimize participation teachers can position students “out of pattern” or “break the pattern”, and practice activities that require the student to perform tasks “out of pattern” (Rosen, 2018). A discussion on “breaking up tone/patterns” is below.
“Breaking” up their abnormal tone by either bending or extending their joints (depending on whether they have flexor or extensor tone), using gentle movement, and not overstimulating tight muscles, should be considered when handling these students (Cicirello, et. al., 1989).
Without proper positioning children with hypertonia are at risk for contractures, which are permanent shortening of the muscles that affect movement and comfort (1989).
“Breaking Up Tone”
The “breaking up of tone” or “breaking up patterns” can be described as changing one or more aspects of the stereotypical patterns of movement, such as students with flexor tone having their joints extended or students with extensor tone having their limbs flexed (Hinchcliffe, 2003).
When “breaking up” tone or patterns, teachers should NEVER force stiff muscles and should ALWAYS consult with the classroom physical therapist on specific strategies.
Gently moving muscles and joints out of pattern, or using special equipment such as side chairs and wedges, can help to break up irregular tone. Consider the example of tenodesis below:
Tenodesis is a technique that can be used to gently open the hand, helping to “break up” patterns. To use tenodesis, gently bend (or flex) the wrist, which will automatically open the hand.
Positioning with Consideration of Specific Movement Disorders
CP can further be classified according to specific movement disorders, including spasticity, dyskinesia, and ataxia.
- The most common of these disorders, spasticity, occurs in 80% of people diagnosed with CP (https://www.cdc.gov/ncbddd/cp/facts.html).
Spasticity occurs when there is damage to the motor cortex and spinal cord, and results in movement that begins with hyper resistance, then releases suddenly.
- It is the most common type of CP, and it can often be comorbid with other types of CP, such as spastic/athetoid quadriplegia.
- Students with spasticity already have high tone, which can increase further when they are excited.
- Click here for more information on spasticity
Fluctuating tone or athetoid tone (dyskinesia) can cause athetoid movement, or movements that are repeated and involuntary, but that may be associated with voluntary movement (Cicirello, et al., 1989).
- Athetoid tone occurs when there is damage to the extrapyramidal nerves, which affect posture, movement, and tone (Howard, et al., 2014).
- Students with fluctuating tone may require firm pressure to help them with stability, or help with pacing activities so they use greater muscle control (1989).
- Physical effort overtime helps to decrease fluctuating tone.
- Positioning for these students should stabilize the trunk, which helps them use their arms functionally, and therefore increase their participation.
The Effects of Reflexes on Tone and Participation
Educators also need to consider how primitive reflexes may affect positioning, when handling students with CP (Howard, et al., 2014).
Primitive reflexes are involuntary responses to stimuli that are designed to help infants create motorpathways that lead to functional neuropathways.
- These reflexes begin developing in utero, are present for during the first months of life, and then are usually neurologically integrated.
Once reflexes are neurologically integrated, allowing children to have control over them.
If these reflexes do not integrate they continue to disrupt locomotion, as they are uncontrollable and involuntary reactions to stimuli (2014).
Primitive reflexes that do not integrate further cause issues with coordination, physical comfort, and the ability to concentrate.
The Startle/Moro Reflex is characterized by a jerking of the whole body, or by flexion or extension of muscles. If not integrated, the startle reflex will interfere with: balance, comfort, hand-eye coordination, socialization, attention/concentration, learning, and coordination.
- Minimize this reflex by: telling students before you touch them, using a quiet voice, moving slowly, and minimizing loud noises.

The asymmetric tonic neck reflex (ATNR) occurs when a child’s head is turned to the side, and the extremities on that side extend, while the opposite sides extremities flex. If not integrated, the ATNR will interfere with: grasp, visual looking behaviors, activities that require bilateral coordination or hands at the midline, rolling and crawling. Can also result in hip dislocation.
- Minimize this reflex by: placing students “out of pattern”, doing activities at the midline, and doing bilateral activities.

The tonic labyrinthine reflex (TLR) is characterized by the body going into an extensor pattern when placed in a supine position, which causes the back to arch. When placed in the prone position, the TLR is characterized by flexion of the joints. If not integrated, the TLR will interfere with: rolling over, sitting up on elbows when prone, ability to sit up doom supine position, balance, crawling, walking, use of hands and arms. Can also result in hip dislocation.
- Minimize this reflex by: Sitting, sidlying, and positions that use flexion and extension.

The bite reflex occurs when the presence of an object in the mouth causes the student to bite until the object is removed. If not integrated, the bite reflex will interfere with: eating.
- Consult with the speech and language pathologist and the occupational therapist to minimize this reflex.
To safely open a clenched hand, do not force the hand open, but gently bend the wrist.
The palmar grasp reflex occurs when the hand closes around an object that makes contact with the palm, and remains grasping until the object is removed. If not integrated, the palmar grasp reflex will interfere with: voluntary grasp and release of objects, weight bearing on the hands, crawling, and protective reflexes.
To minimize this reflex: position student to weight bear on open hands.
The equilibrium reaction occurs when the body adjusts to stay upright in response to slow tilting of the supporting surface. This reaction should develop between 5-12 months, and if not developed will cause: falling/poor balance, an atypical gait pattern, a wide base of support, absence arm swing, and smaller steps.
To encourage this reaction: use a tilting surface (such as a rocker board) to practice equilibrium.
To minimize the presence of abnormal reflexes teachers can use slow motions, a quiet voice, minimizing stress, keeping surroundings quiet, and warning students of upcoming transitions.
Strategies that help to integrate reflexes that decrease participation require teachers to consult with a physical or occupational therapist.
- When positioning students with abnormal tone teachers should “break up” abnormal tone and reflexes.
- Students should be moved every 15-30 minutes to prevent pressure sores and increase circulation, according to instructions from the physical and/or occupational therapists.
Teachers must consult each student’s medical records before they attempt positioning a student.
Slow movements and firm but gentle pressure should be used when handling children.
- When handling and positioning a student, teachers must build trust with the student, tell the student what is going to happen before it does, and place the student in symmetrical positions.
Students should help position themselves to the greatest extent possible.
How to Position Properly
Remember to always consult with the physical therapist before positioning students!!!
Supine
In proper supine positioning the student should:
- Be capable of moving their own head
- Head should be positioned at the midline if they cannot move it independently
- Have their body should be straight and symmetrical
- Rolled up towels or bolsters can aid in keeping body straight
- Have hips bent
- Place a towel or bolster under the knees to keep hips bent
- Not have their legs crossed or scissored
- A pillow can be placed between the knees to prevent scissoring
- Have their toes facing upwards
- Use orthoses such as ankle foot orthotics (AFOs) if feet are pointing downwards
- Have their shoulders supported and forward
Prone
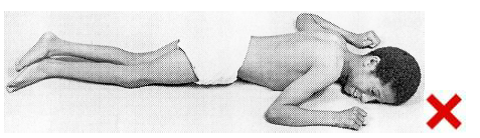
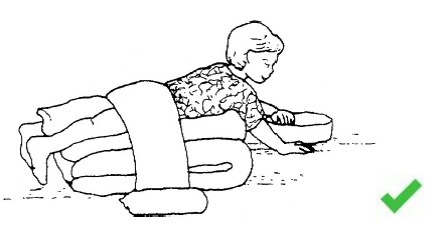
In proper prone positioning the student should:
- Have their head at the midline
- Be encouraged to lift their head
- Have their legs and feet in a straight line
- Applying pressure or weighted bags to the hips/bottom can help to encourage hips to straighten
- Have their arms in line with or in front of their shoulders
- Have open palms and be weight-bearing on the hands
This positioning may not be appropriate for students who hyperextend their necks or who engage in extensor thrust: ALWAYS CHECK WITH PT BEFORE POSITIONING.
Sidelying
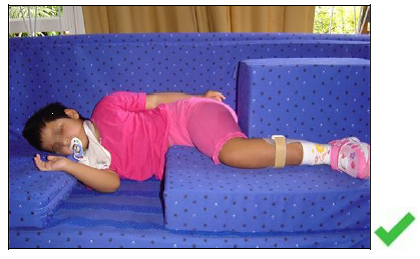
In proper sidelying positioning the student should:
- Have their head supported and at the midline, keeping the spine in a straight line
- Have their entire back supported
- Have one leg straight (extended) and the other bent (flexed)
- Have their shoulder and arm forward, not underneath them
- Have both arms forward
- Encourage them to do an activity at the midline
Supported Sitting with Caregiver
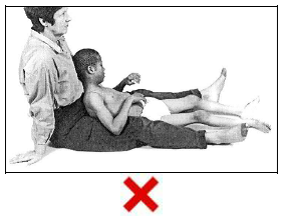
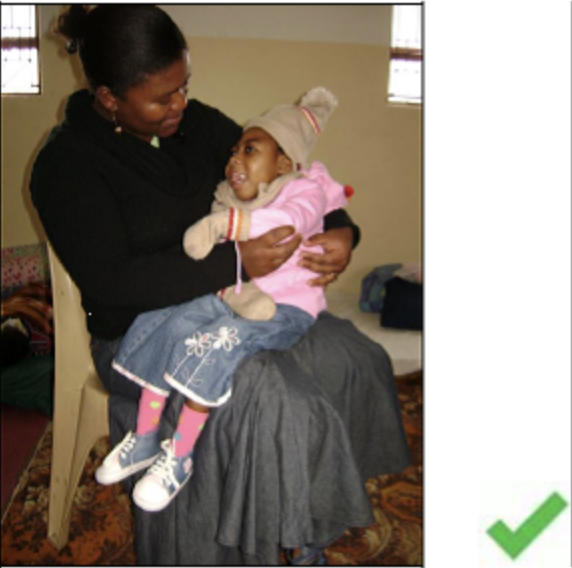
In proper supported sitting with a caregiver positioning the student should:
- Have their head and back supported, if they cannot hold up their head independently
- Have minimal support at their back and/or hips if they can hold up their head independently
- Using their own muscles to fight gravity and hold themself upright
- Have their hips at a 90 degree angle
- Have their feet on the floor or supported (if possible)
- Have their shoulders forward, and be able to use their hands and arms for activities
Sitting in a Chair

In proper sitting in a chair positioning the student should:
- Be sitting upright with their head upright and their back straight
- Have their bottom all the way at the back of the seat
- Have any chair straps tight enough to provide support and prevent slipping
- Have their legs and feet supported, not dangling
- Have their shoulders and arms forward, and be able to use them to engage in activities
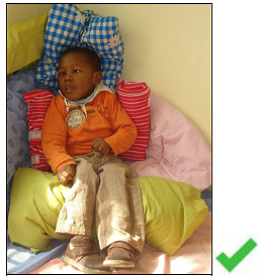
Sitting on the Floor
In proper sitting on the floor positioning the student should:
- Switch sitting positions occasionally, in order to develop good sitting balance. This includes:
- Sitting independently with their legs crossed
- Sitting with their legs straight or extended
- Sitting with their back supported in a corner
- Sitting with their legs swept to one side, and then the other
Standing
In proper standing positioning the student should:
- Have their back straight
- Have their hips facing forwards
- Have their feet on the ground and their toes facing forwards
- Be bearing their weight on their feet
- Have their shoulders and arms coming forward to engage in activities
- Possibly be bearing weight on their arms, if they have access to a table or tray
Using Active Seating for Optimal Participation

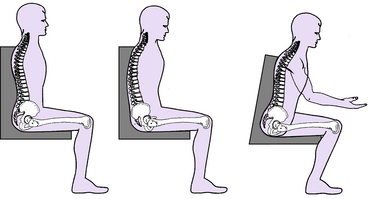
Optimal task engagement/participation for students with OI should utilize active seating with weight-bearing at the pelvis.
Active seating is seating that allows for students to control their own posture, which helps them to independently control their own movement (PaTTAN, 2020).
Active seating should include stability at the pelvis, which is critical to independent movement.
- The pelvis itself houses a person’s individual center of gravity which, when engaged and moving forward, naturally supports focus and looking behaviors, such as visual convergence.
Active seating requires weight-bearing in order to use gravity to engage the vestibular system, involves the body being in an upright position, and should have the head in front of the shoulders.
- Students may not be in a symmetrical position during active seating, all parts of the body should not be in contact with the surface of the seat or chair, and the feet should be making contact with the ground.
Just as when we lay down in a bed at night or relax on the couch, the more the body touches a surface the more it will “give in” or relax onto that surface, increasing relaxation and decreasing active participation (Kangas, 2007).
- Active seating decreases relaxation while increasing engagement of the pelvis and vestibular system in order to increase natural attention.
Keys to Active Seating:
- Student should be in an upright position
- Student should be bearing weight at the pelvis, which should be tilted slightly forward
- Pelvis should be stable
- Feet should be touching the floor
- Body does not need to be in a symmetrical position
- The whole body should not be in contact with the chair/surface of the seat
- Head should be in front of the shoulders
- Vestibular system should be engaged and body should be working against gravity
This positioning should be paired with activity and engaged in frequently so the student can experience the positioning paired with an activity over time.
- For more information on active seating, view Karen Kangas’ discussion on the subject: